Popular Posts

Thursday, April 7, 2011

MARMALADE A L’OGNION

Some of the most flavorful dishes are incredibly easy.  A Caprese salad only has three ingredients: sliced tomato, sliced buffalo mozzarella and basil leaves (which you then drizzle with extra virgin olive oil – evoo – and a bit of balsamic vinegar,  salt and pepper).  A fantastic tapenade consists of pitted olives, evoo, garlic and salt milled into a paste.  Hummus is another perfect example: chickpeas, lemon juice, garlic and evoo.
Here is a flavorful side dish or condiment in that same style – an onion marmalade.  Don’t let it scare you – all it requires is really good onions, a bit of oil, a dash of salt, thyme and some patience.  I was given a huge bag-full of lovely organic onions by my neighbor – from her mother’s farm.  We’re grilling steaks, roasting potatoes, there’s an arugula salad with my go-to salad dressing and I didn’t want this lovely gift to go bad on the counter.  First order of business was to peel off the outer skins and root ends.  Rinse off any dirt, then begin to slice them all nice and even.  Go slow as you slice, it’s not a race, don’t put stress into the pan and don’t lose any fingers.  Remember: dull knives cut fingers.
I had a total of 12 onions – it sounds like a lot, but the slow cooking process will reduce them considerably.  As they reduce, the flavor will become very concentrated: YUM!
Throw the slices into a large wide pan with a tight-fitting lid.  The bottom of the pan should have 1 tablespoon of evoo, and another one of safflower oil (or another flavorless oil) because it withstands higher heat, is flavorless and will actually enhance the olive oil's heat resistance for the process.  I’m also going to grab some thyme from my garden (2-3 sprigs) though 1 tablespoon of dry thyme, crushed between your fingers to release the flavor will work almost as well.  Add a tablespoon of sea salt (over 1.5 lbs of onions – the salt will help them go sweet as they cook slow).
Initially I start them on the highest heat – I also want to separate all the layers and coat everything thoroughly with the oil, salt, and thyme.  I use a wooden spatula for this.  Then, as they begin to get glossy, I’ll put the lid on it and bring the heat down to med for 15 minutes.  Note: If it’s an electric stove, switch burners so you don’t burn the bottom (burned onions are not what you’re trying for).

As they begin to brown, give it all a good stir and take the lid off, but hold your horses and allow the flavors to develop.  Every few minutes you can walk by and stir it until it begins to caramelize.  In my kitchen (because of the humidity in S. Florida, my gas stove, etc.) it took 45 minutes.  It might be less in yours – but this is what you’re going for: slightly golden, slightly sweet and very flavorful!
If you’re concerned about the oil, separate the solids, decant into a dish and serve as a condiment to a great grilled steak, lamb, chicken or pork.  Enjoy this little trip from the South of France, to my kitchen, to your table.
Let me know how yours turns out!  Mine was so good it stood up to a hearty glass of Bordeaux on whole wheat bread.  Ah!  Provence!
This simple dish is chock-full of flavor.  Enjoy!
 

Wednesday, March 30, 2011

EMERGENCY CHOCOLATE CAKE

EMERGENCY CHOCOLATE CAKE
Nothing scares most of us as much as baking – and rightly so.  Cooking is all about doing things with your own sense of style.  Baking is scientific – biochemistry taken to the nth degree.  My sister’s birthday was coming up and I hate store bought cakes – they’re always greasy (they use heavy greasy vegetable oils) and a terrible combination of bland cake with  oversugared frosting: TERRIBLE.  My sister was having a birthday and all birthdays after 35 require emergency doses of chocolate.
I searched through recipes in my books and on-line for a couple of days.  I finally settled on one online culled from Gourmet Magazine 1996 called “Stout Chocolate Cake.” 
As to the cake: I followed the recipe to the letter.  Though I’ve been cooking since my teens (a long time) – baking a cake is ALWAYS an ambitious undertaking… and it even scares me.  I’ll include the recipe for the cake at the bottom of this entry and remember, it’s not mine, though I made it my own by adding a few choice ingredients.
Above: the cakes are cooling in their 9x2 pans for 10 minutes before I flip them over.
Here’s my personal philosophy on chocolate:
1.      More is better.
2.     Semi-sweet is better than too sweet.
3.     Good chocolate requires depth of flavor (hidden touches of sea salt, ground cinnamon or allspice, espresso, vanilla, dark rum and cayenne and/or black pepper) so don’t be afraid to add little touches of these (in whatever combination you feel) to bring out the most from your chocolate.
4.     Go for the good stuff – it’s worth it in the end, and also easier to melt than the cheap stuff.
Above: the cakes have been taken out of the pans – I’m allowing them to cool completely before beginning the assembly process which will include slicing in half them with a long serrated knife….!

Once the cakes were made, then I’m no longer baking, I’m cooking – so I was back in my element.  It was time to make the frosting and the glaze (ganache).  These are fundamentally sauces – I’m the sauce KING, so no worries.
I selected a sour cream based frosting which I’ve used before - because it always works.  You will need 2 cups sour cream, 1 cup heavy whipping cream, 4 oz semi sweet chocolate, ½ cup fine cocoa powder, ¾ cup confectioner’s sugar, 1 teaspoon vanilla, ½ teaspoon sea salt, 1 teaspoon dark rum, 1 teaspoon really strong espresso, ¼ teaspoon allspice.
First blend the sugar with the heavy cream – don’t struggle – use your hand blender for this – get it to soft peaks.  Add in the sour cream, continue whipping till you get stiff peaks.  Don't have one?  Make the $12 investment - it's worth it.  In the meantime - you can obviously use a whisk, though it will be a workout.
Above: double whipped cream with little specs of ground allspice.
Combine all the other elements (except the cocoa powder) over double boiler (this is a simple pot of simmering water, a clean metal bowl – and a silicone spatula.  Make sure the chocolate is fully soft and smooth.  Take it off the heat and add in a large dollop of the double cream to cool it and thin it down.  Now transfer all the chocolate into the double cream.  After you’ve blended it thoroughly with the spatula (try not to deflate), add in the cocoa powder.
Above: The cocoa is about to be blended into the double sour cream chocolate mixture.  The result is a double chocolate frosting/filling: MMmmm.
Put on your surgeon’s hat and cut the cakes in half.  Do it slowly, try not to lose too much crumb and the straighter it is, the easier it will be to assemble.  [Remember, everything will be frosted so don’t sweat this unnecessarily and it can get a bit messy but to date, nobody’s died from a chocolate splatter on the floor]
Note:  Those crumbs were very tasty so I now know the cake is good.
I lined my fancy cake stand with wax paper strips and set the first half cake on top of the wax paper.  Frost the surface thoroughly and add on the next layer.  Frost the surface thoroughly and slice the next cake in half.
Above: frosting will help repair any little breaks that might happen as we try to remove the cake from the pans.  Who am I kidding, a little kitchen mouse (me) couldn’t help but have another taste!  The assembly is nearly complete.  Repeat the process and once you’ve got all four layers on the stand, cover with a light layer of this sour cream frosting.
Above: the cake has been thoroughly frosted – the rich sour cream frosting will be absorbed into the cake and it also hides any flaws.  Stick the cake in the fridge for a bit – this cooling down process is absolutely necessary here in Miami where the humidity works against you.
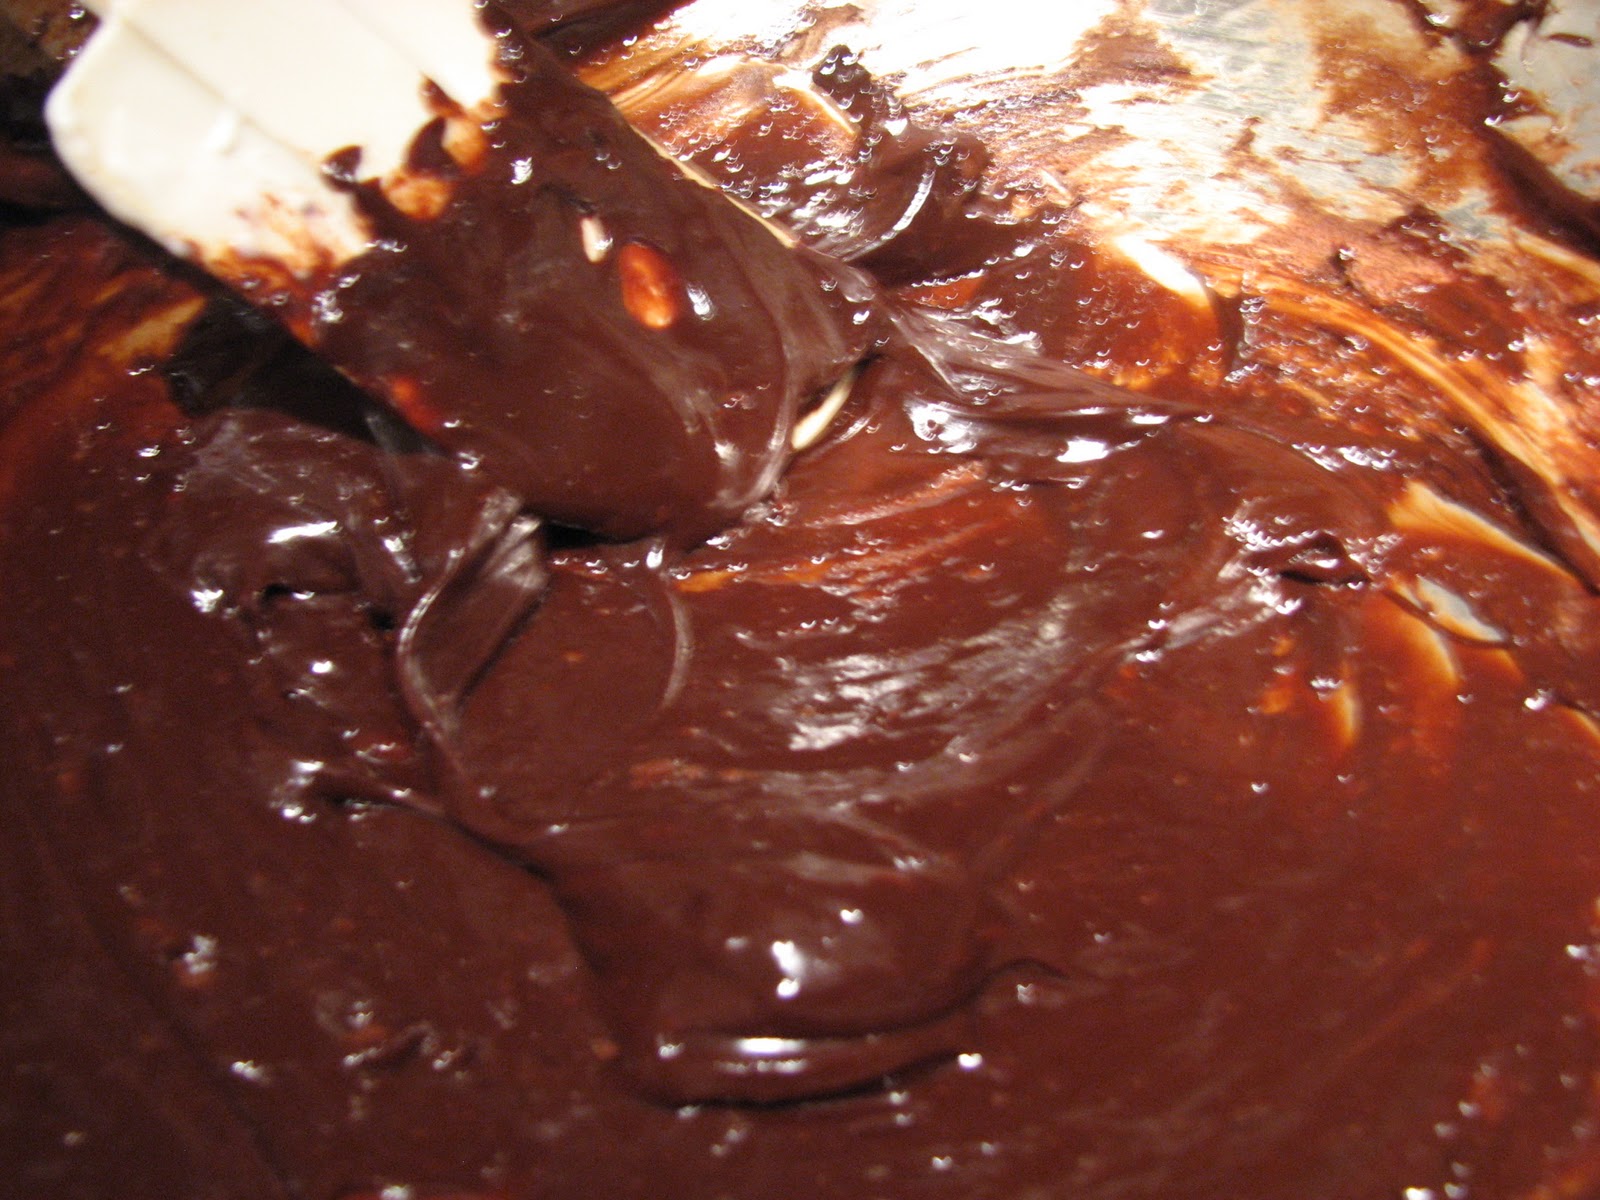
Now we can begin the final glaze.  You will need 4 oz of semi-sweet chocolate, 2 tablespoons of unsalted butter (please don’t use anything else – it just won’t work), 1 tablespoon of dark rum, a dash of allspice and a ½ teaspoon of vanilla.  All this goes into your metal bowl over slowly simmering water.  Mix thoroughly with a spatula till it is glossy and smooth.
Above:  keep mixing till everything comes together.  Here - it's already quite glossy from the butter and the rum.
Take it off the heat and before it begins to become a solid, glaze the top of your cake.  Then, back into the fridge it goes.
Above:  the warm ganache may drip down over the edges – that’s okay. 
Now, for the final step: I like to make something I call "chocolate sand" for the sides.  I take ¼ cup of roasted sunflower seeds, ¼ cup of semi-sweet chocolate morsels and ¼ cup of good cocoa powder – I pulse these in a grinder and spoon as much of it as possible onto the sides of the cake.  Once I’ve done this – I take the wax paper off and allow to cool overnight.
In the morning – I drove it to my sister’s where an emergency dose of chocolate was needed and we had it for breakfast.
Above: see how the cake absorbed all that rich frosting?  It was truly anything but bland.  The cake was firm but moist, the frosting had character, the glaze on top was a rich reward, and the chocolate sand had that beautiful touch of nut and subtle savory salt that made it all VERY adult.
Nevertheless, it did meet with kid approval, as the photos below show:
Above: my niece, a lovely but already surly teenager, preferred it to oatmeal.

Above: a slice of this sinfully good cake with fresh mulberries from my tree.....!
Above: my nephew enjoyed it with his vitamins… even though he couldn’t understand why it tasted “French” (his code for adult).  He also asked:  "Why didn't you just open a box?"
Let me know how this trip from my kitchen, travels to your table.

STOUT CHOCOLATE CAKE*:
  • 3 ounces semisweet chocolate, chopped
  • 1 ½ sticks (¾ cup) unsalted butter, softened
  • 1 ½ cups granulated sugar
  • ½  cup firmly packed light brown sugar
  • 1 ¾  cups sour cream
  • 1 ½ teaspoons vanilla extract
  • 3 large eggs
  • 2 cups all-purpose flour
  • ½ cup unsweetened cocoa powder (not Dutch-process)
  • 1 teaspoon baking soda
  • ½ teaspoon sea salt
  • ½ teaspoon allspice
  • 3 turns fresh ground black pepper (don’t bother with pre ground)
  • 1 dash cayenne pepper
Preaheat oven to 375°F. Butter and flour two 9- by 2-inch round cake pans, knocking out excess flour.
In a double boiler or a metal bowl set over a pan of barely simmering water melt chocolate, stirring until smooth, and cool.
In a large bowl with an electric mixer beat together butter and sugars until light and fluffy. Beat in sour cream and vanilla until combined. Add eggs, 1 at a time, beating well with after each addition.
In a bowl whisk together flour, cocoa powder, baking soda, and salt and gradually add to sour cream mixture, beating until just combined. Beat in chocolate until batter is just combined and divide between pans.
Bake layers in middle of oven until a tester comes out clean, about 30 minutes. Cool layers in pans on rack 10 minutes and invert onto racks to cook completely.
* Gourmet magazine – 1996

Monday, March 14, 2011

TUSCAN STRAWBERRY SALAD


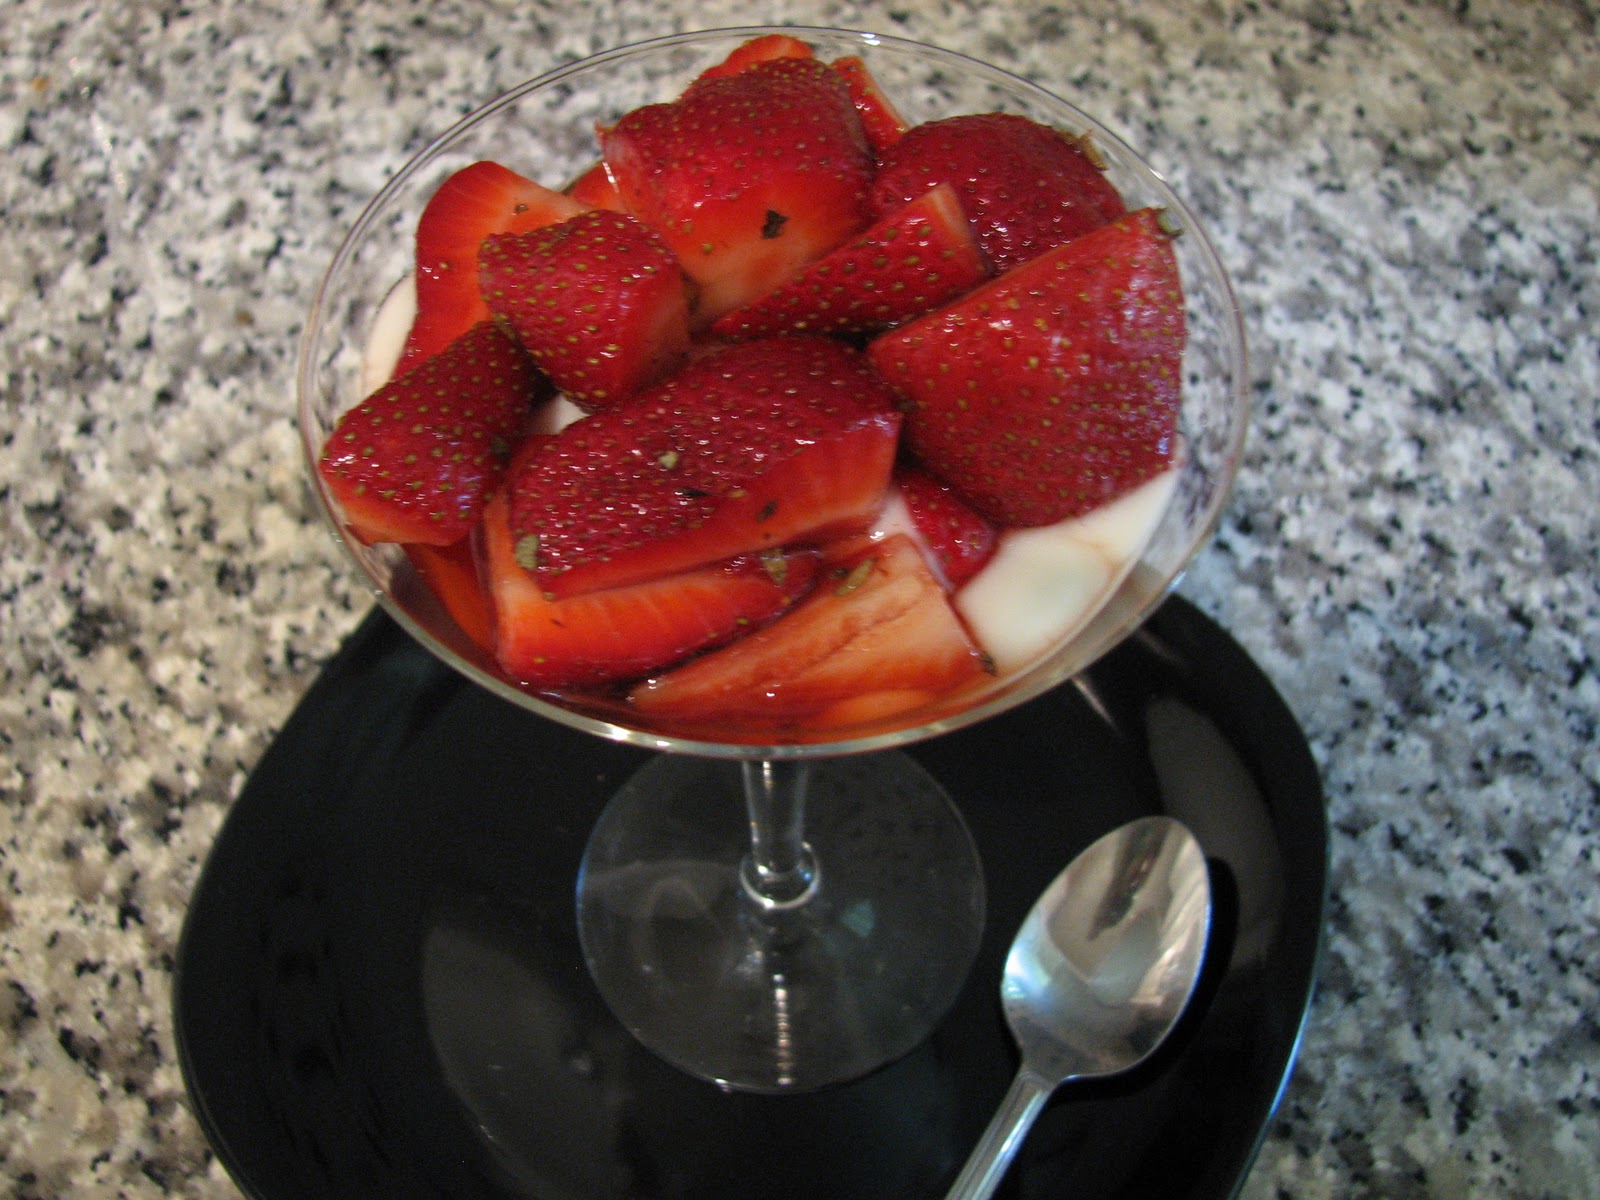
In the kitchen, as in life, “elegance” is about allowing the elements to shine through.  This simple desert salad is a perfect springtime treat + my acupuncturist, Dr Li, says that strawberries “moisten” your joints and ligaments (this is the Chinese medicine way of saying: keeps you young).  After my treatment I went straight to the market to buy strawberries - and they were locally grown, organic and amazing.  I have a very unique Balsamic vinegar that I brought back with me from Italy and the Herbs de Provence have been begging for use. [NOTE: Herbs de Provence is a dry herb mixture of oregano, basil and lavender.]
Because strawberries tend to be sandy, soak them in cool water.  I chop off the green heads and half them (or if they’re really big, I’ll quarter them) – this is the hardest part of the dish, so don’t fret.  I usually throw out the cuttings right into my garden where they’ll help make the soil richer.
Next, into the waiting bowl, I’ll toss in ¼ - ½ cup of vanilla sugar (see details below), 1 tablespoon of Herbs de Provence (if you don’t have them, substitute or mix with dry oregano and dry basil), a ¼ teaspoon of freshly grated nutmeg, and finally, a tablespoon of balsamic vinegar.  Because it’s only a flavoring agent on my 2 pints of strawberries, it doesn’t have to be the $16/bottle gourmet kind (in the photo); even the simple store brand kind will add a delightful freshness to this dish. 
Stir this with a wooden spoon and allow to sit for ½ an hour (the cooking term for this is “macerate”) – the strawberries will release their juices, the fruit salad will become fragrant and sweet. 
See how it glistens – the combination of the balsamic vinegar with the sugar brings out the best in the strawberries.  Spoon it into a dish of low-fat vanilla yogurt, or sin a little, and top off some gelato with it.  This is a perfect ending to an everyday baked chicken dinner – and it will also make any meal end on a high note.
This simple Tuscan fruit salad is a journey you can share - from my kitchen to your table.
Vanilla sugar: Vanilla beans are expensive.  I usually use them if I’m making a rice pudding, or a panna cotta.  Their flavor is far superior to any extract on the shelf.  You slice them in half, scrape out the tiny seeds and put them into the scalding milk, then take them out.  At this point, don't throw them out - they’re still perfectly useful and incredibly fragrant.  Allow them to dry and stick them inside your sugar container – viola – each spoonful of sugar will now have a touch of vanilla essence on it.  This trick will make your coffee that much richer (this means it will need even less sugar = less calories), and all your deserts will also have another level of depth.  Enjoy.

Friday, March 4, 2011

GO-TO PIE CRUST AND FOOLPROOF QUICHE

Fool proof crust and quiche!
Making your own crust is easy if you have the right recipe.  This is my go-to pie crust – perfect for a savory tart or a desert.  With a few minor adjustments you’ll feel like a pro.  Promise!  You’ll never buy a stale store-bought crust again.

You’ll need:
1 cup simple (not self-rising) white flour, ½ teaspoon of kosher or sea salt, ½ teaspoon of ground black pepper, pinch of sugar (don’t skimp on this), 1/3 cup of light vegetable oil (I’m using cold pressed safflower oil these days) and 3 tablespoon of ice water.  Also, to make your crust relate to the filling, add ½ teaspoon of whatever herb or condiment will be in the filling such as: oregano, dill, cinnamon, allspice, etc.
Preheat your oven to 325F
First combine all the dry ingredients.  Use your hand (or a fork).  Add the oil and the water and combine till it pulls away from the bowl.  
Don’t over mix or it will get tough.  It’s okay for it to be a bit crumbly.  That’s how you get a flaky crust.  If you want, to make for an easier transfer, roll it out onto wax paper (or aluminum foil, or even plastic wrap) into a ¼” thick disc.  Don’t have a rolling pin?  Use a bottle of wine.  Sounds daunting?  Don’t sweat it – form it into a flat disc in your hand and use your fingers to have it stretch out and fill the pie-form.
NOTE: If you want a very glossy crust, add a whole beaten egg and about ¼ cup more flour.  Everything else, same as above.
It doesn’t have to be perfect – if it doesn’t quite cover your pie form, stretch it out with your fingers.  Use the bits that hang over to make any necessary repairs.  The point is simply to have the pie form bottom covered.  Use a fork and poke some holes in it (this keeps it from bubbling or rising) and the tines can also help create a decorative edge.
It goes into the oven for 15-20 minutes till it starts to become a little bit golden. 

NOTE: I’m making a zucchini quiche to take to a picnic.  This filling will have some thyme, so I also added dry thyme in the crust.  I always like to have a unified theme or “story” in my food.
Now for the filling:
You’ll need 4 eggs, 1 cup of milk (or ½ n ½ if you don’t mind the calories), ½ cup of grated gruyere or Swiss cheese, ½ teaspoon kosher or sea salt, ½ teaspoon of black pepper, teaspoon of ground nutmeg (grate it fresh – it’s so much better, you’ll never go back to pre-ground), ½ teaspoon of cream of tartar (makes it all very fluffy), 1 teaspoon of dry herb (for example: oregano, thyme, lavender, tarragon, or chopped fresh rosemary) and a dash of cayenne pepper or Sicilian red pepper flakes for depth. 

My grater (a micro-plane from the hardware store) with 2 whole nutmegs – the flavor is exquisite!

Above: the filling is ready for the crust
NOTE: Zucchini is a bit wet, so I used a little less milk.  Just over ¾ of a cup.

VARIATIONS ON THEMES:
If it’s quiche Lorraine: ¼ cup chopped cooked bacon
If it’s Zucchini, or Spinach – 1 cup chopped or grated
If it’s black olive – 1 cup chopped
If it’s broccoli – 1 cup cooked, thinly sliced
If it’s carrot – 1 cup finely grated, or 1 cup slightly cooked and sliced.
If it’s tomato – 1 cup peeled, seeded and drained.  Add basil to this one.
Beat the eggs with the milk – use a whisk, add the dry condiments, the cheese and the theme (zucchini, etc.)
Want to make your quiche look outstanding?  Put half of the filling through the blender – this is especially impressive with broccoli, tomato or spinach quiche.
The pie crust is done.  Add the filling and back into the oven (now at 350F) for 45-60 minutes – till it no longer jiggles in the center.
Off to the picnic we go – it flew!  I had to grab myself a slice so I could show you a picture.
Try your own variation – let me know how it turns out.  I always love to hear about these journeys from my kitchen to your table.
These quiche ideas make a great go-to light lunch or weekend brunch.   Add a green salad and you're done!
Another time, we’ll make a couple of fruit tarts with crème patissiere (a thick custard) next time.  Sometimes a great meal needs a great finish.

Wednesday, February 23, 2011

MEATLOAF ROULADE

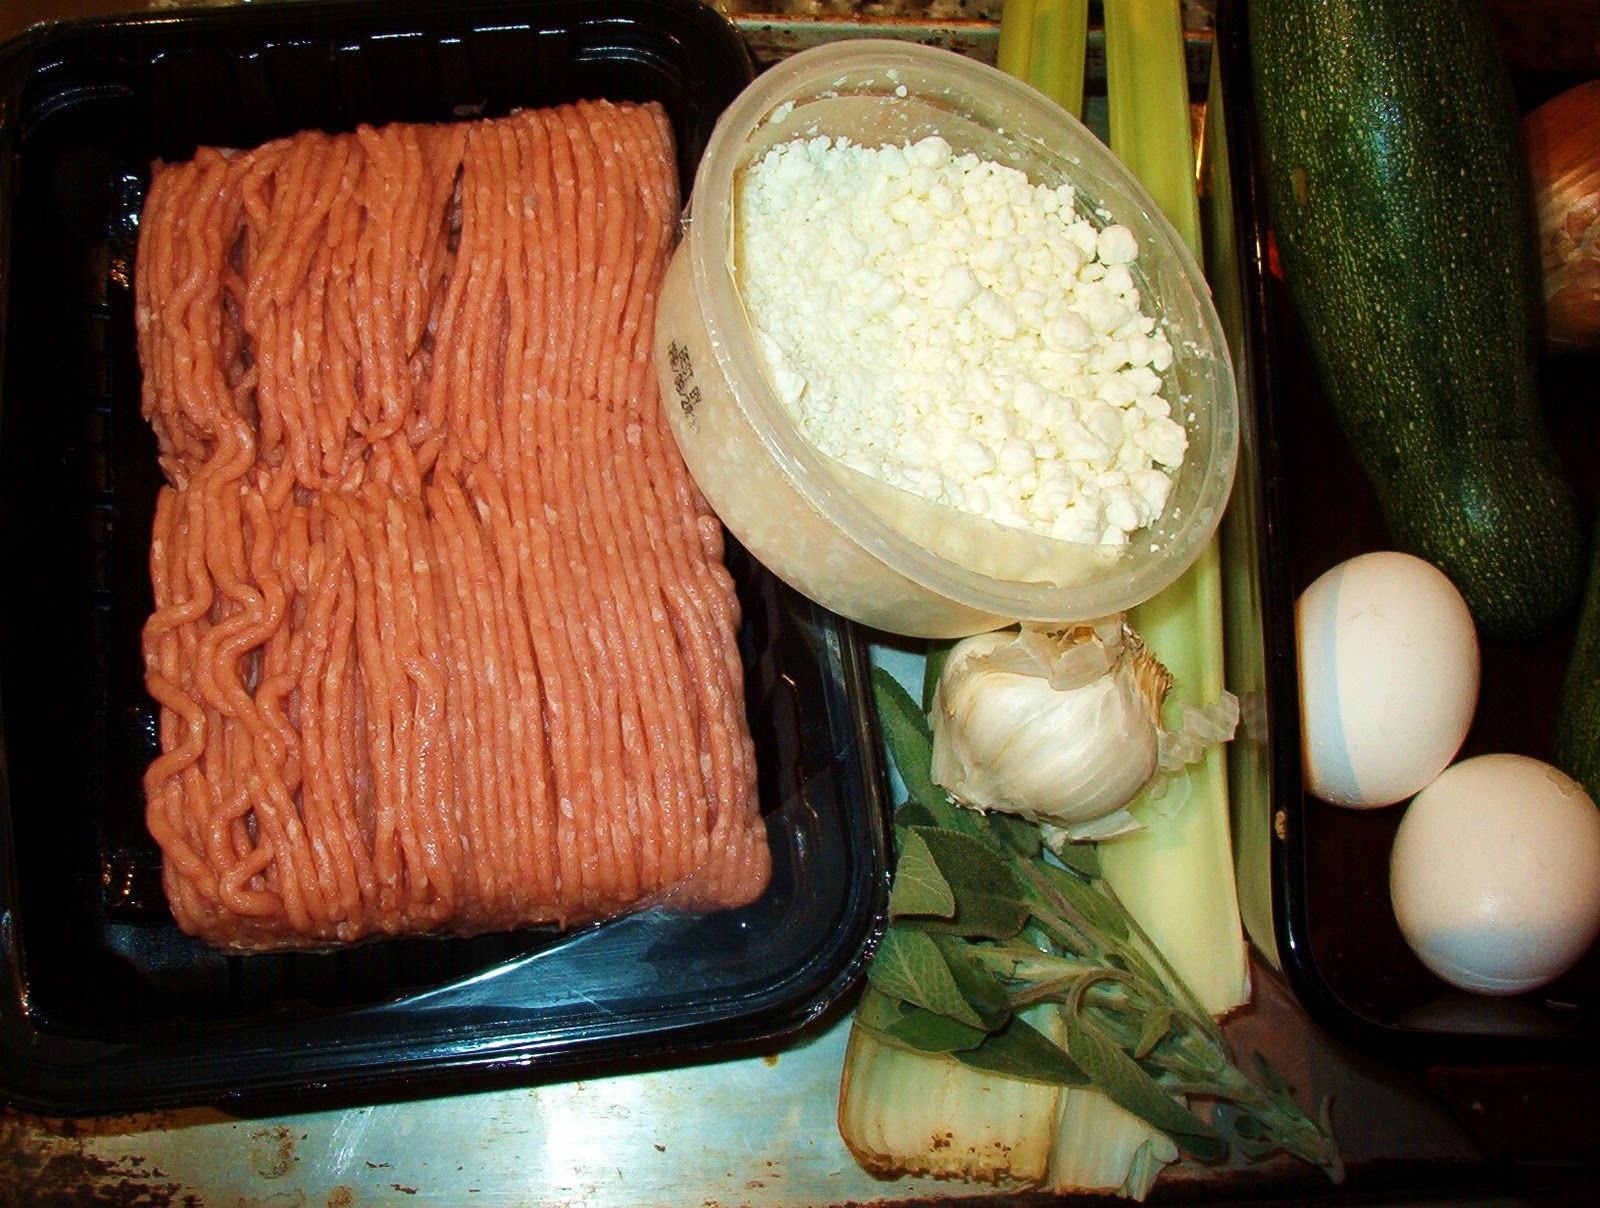
Above: All my ingredients for a great dinner!
(TURKEY) MEATLOAF ROULADE
I’ve been craving a meatloaf but I also want to keep the fat down – solution?  Turkey meat loaf made with 94% fat-free fresh ground turkey – and since turkey can be dry, I’m going to stuff it (thus the roulade) – this will keep it moist and make it stellar.
What I’ll need: 2 eggs, 2 zucchini (or 3 carrots), 1 lb of ground turkey, some rye bread crumbs, ½ cup oatmeal, some crumbled goat cheese, 1 large yellow onion, 2 celery stalks, 2 cloves of raw garlic and fresh herbs.
Side dish: Smashed Yukon gold potatoes, a bright green salad (arugula – I’m addicted to it and its in season, a granny smith apple) and I have a ¼ bottle of Cabernet left from Valentine’s Day – I’ll make a red wine reduction with it.  It sounds fancy but don’t be fooled – it’s easy and you’ll feel like a Master Chef!
Veggie prep is easy - just remember to seek flat surfaces for stability and safety.
BACK TO BASICS NOTE: Whenever we slice anything we always seek a flat surface. Cut round veggies in half – place the flat side down for stability.  This saves fingers!
The veggie prep: wash the zucchini, the herbs (sage) and the celery.  Cut off the tops and the bottoms.  Peel the onion and the garlic – rough cut these.  I have a wonderful little grinder – I want these minced.

Simply rough cut the onions, garlic and sage leaves.
The first pulse leaves everything minced... perfect!
Scrape ½ of the minced garlic/herb and onion mix into a bowl.  Toss in 1 whole egg, some dry oregano, dry thyme, ½ tsp kosher salt, 3 good grinds of fresh ground black pepper, and the turkey. 
I’m going to put the celery through my food processor with the grater attachment.  Take out any fibers – you don’t want them in the mix.  The grated celery will add another element of flavor and moisture to the turkey so it’s worth the trouble.  If you don’t have a food processor, simply chop it extra fine.
Everything is now ready to blend gently with a spatula.
Above: the ground turkey, goat cheese, oatmeal, grated celery, minced onion/garlic/sage + a dash of cayenne (for heat and depth of flavor), a dash of allspice (or fresh ground nutmeg), 1/2 teaspoon of salt and 1 teaspoon pepper – read to mix.
Mix everything fully but don’t overwork it (makes it tough).  At this point the mix is going to be wet – add the crumbs – a bit at a time, till it all holds together.  It resembles bread batter when it's right.
perfect consistency - moist but holds together.
Note: You’ll know when it’s at the right consistency because the mixwill pull away from the bowl
Now, I can focus on the stuffing.  I use the food processor to grate the zucchini – a hand-held grater will also work – but will take a bit more time and care.  Cut them in half and push them through – voila!  Toss the grated zucchini into another bowl, add an egg white (toss the yolk), add salt, pepper, cayenne or red pepper flakes to taste – grate a bit of fresh nutmeg for brightness and the remainder of the minced onion mixture. 
The stuffing is prepped and ready to mix.
Note: The egg white will help bind it.  It is a bit wet, and that’s okay.  If you use carrots instead, the stuffing will be dryer.
BACK TO BASICS Note: having good tools in the kitchen makes easier work of it all.  Get an electric grinder, a food processor, they really are great timesavers.
Now we’re going to assemble.  Use aluminum foil to cover a baking sheet.  Place another sheet shiny side down, here you can use a little spray oil, or simply brush on some olive oil to the foil.  This will help it all release later.  Spread the turkey mixture out onto the wax paper.  Try to get an even thickness and a rectangular shape.  Next, spread the zucchini stuffing mixture just short of the edges also, as evenly as possible.
Be playful here - it's like coloring - you want to stay inside the lines of the rectangular turkey mix.
Now, it’s ready to assemble.  To make the roulade (it’s like a turkey jelly roll), use the wax paper as a guide.  Lift it up and as you lift, you move everything evenly to the center of the baking dish.  Oiling the bottom piece of foil serves 2 purposes.  It will keep the roulade from sticking later, and it makes it slide now.
easy does it....nice and steady.
Keep rolling until the seam is on the bottom.  Use the wax paper to even it all out and seal the ends.  The zucchini mixture is watery – sop up the excess with paper towels – if you don’t, the liquid will keep your meatloaf from sealing shut.  Not a disaster, but it won’t be pretty.  Pat the outside of the loaf dry, and make sure to close off the ends.  Use your fingers.  Also, if it's a bit lopsisded, use the wax paper to help round it out and form it. 
Finally, to seal in the flavors, sprinkle some seasoned flower over it.  (1/4 cup of white flour with salt, pepper, cayenne and thyme – all whisked together).  The flower will help seal in the juices. 
I'm going to tent it with foil and then bake it.

Tent it with foil (make a crease down the center of you foil to keep it off the meat – and place into a preheated 350F oven for 35 minutes. 
While the loaf bakes, slice the Yukon gold potatoes and a peeled clove of garlic + an herb from your theme of the night (thyme, oregano or sage).  Rough cut them evenly and cover with water.  Add a generous dose (a heaping tbsp) of kosher salt.  Boil till a knife goes in easily.  Drain the water, add a dollop of light sour cream and smash it all thoroughly (you now have garlic smashed potatoes). 
boil the evenly cut potatoes on med-high till they're fork tender.
Put the red wine into a small sauce pan and bring to a rolling boil.  Add 3 teaspoons of balsamic vinegar, a touch of salt, some fresh black pepper and a spring of sage.  Also add a good tablespoon of strawberry or black raspberry jam (this is a trick I learned from very good Danish friends) – and as it reduces by half, it becomes glossy and fantastic.  Add a pat of butter and voila: red wine reduction extraordinaire! 
this red wine reduction will make you feel very "Mater Chef"!!!
Peel and slice the apple for the salad.  I’ve got some of my go-to vinaigrette in the fridge – dress the apple with the dressing (the acid in the dressing keeps it from going brown).  Prep the greens (arugula) and compose the salad (make it pretty) by laying the apple slices on top.
The salad is prepped, the wine is flowing, the red wine reduction is glossy - dinner is done!
BTW: I’m sharing this meal with a friend who is a Master Chef in his own right.  But, no worries – this is a foolproof crowd pleaser.
Uncover the loaf and brush on any juices – this final basting will help it brown.  Put back into the oven for 10-15 minutes.  Then, take your roulade out of the oven and allow it to rest for 15 minutes.

Let it rest before you slice it.  It's the secret to juicy meat, pork, lamb and chicken dishes.
I began this meal with the salad… American style.  Next came the turkey roulade with smashed garlic potatoes and a drizzle of my red wine reduction made it all spectacular!  Please join me on this journey from my kitchen to you table - Enjoy!
See:  guilt free and lots of TADA!
This is a meatloaf is jam packed with so much flavor… you’ll stay up daydreaming about the leftovers.  Note:  it slices even better cold for lunch the next day.
This is truly meat and potatoes with zero guilt and quite a bit of TADAH!
NOTE:  If you use carrots instead of zucchini, grate and toss with a bit of brown sugar for added depth of flavor.  The carrots are drier at the start, but the result will be the same, a moist delicious treat for the eyes that is an upgrade on a meatloaf.
Here's the carrot filled version - an excellent lunch served with red cabbage and carrot salad
Always feel free to send me your questions.  Are you trying any of these recipes out?  I’d love to hear how it goes for you.