Popular Posts

Sunday, September 4, 2011

FUSING THE OLD WORLD WITH THE NEW

This entry is all about the fusion of old world flavors with new world ones.
Summer Luncheon
I’ve heard it said that truly great cuisine is accomplished in the shopping… in other words, great ingredients make great meals.  The other thing that we have to remember is that elegance is simple – overwrought, overworked ingredients make for muddy flavors and elegant meals are often very simple.  A great steak is grilled over medium heat – a good marinade is all it needs.  A great piece of fish is cooked to its point at medium high heat with a bit of pepper and herbs… simplicity is the key.
Here’s a summer luncheon that is memorable made with a true star from nature’s bounty: the carambola – also known as the “star fruit.”
I am lucky enough to live in a place where these beauties are found at the local market.  However, I’ve always found them, though very decorative, to have very little flavor.  My friend has a carambola tree in full fruit in her back yard and I plucked this one in the photo right off the tree.  When it became bright orange and began to have a lovely fragrance I knew it was ripe.  [Want to know a trick to having a carambola taste this good?  Don’t refrigerate it!]

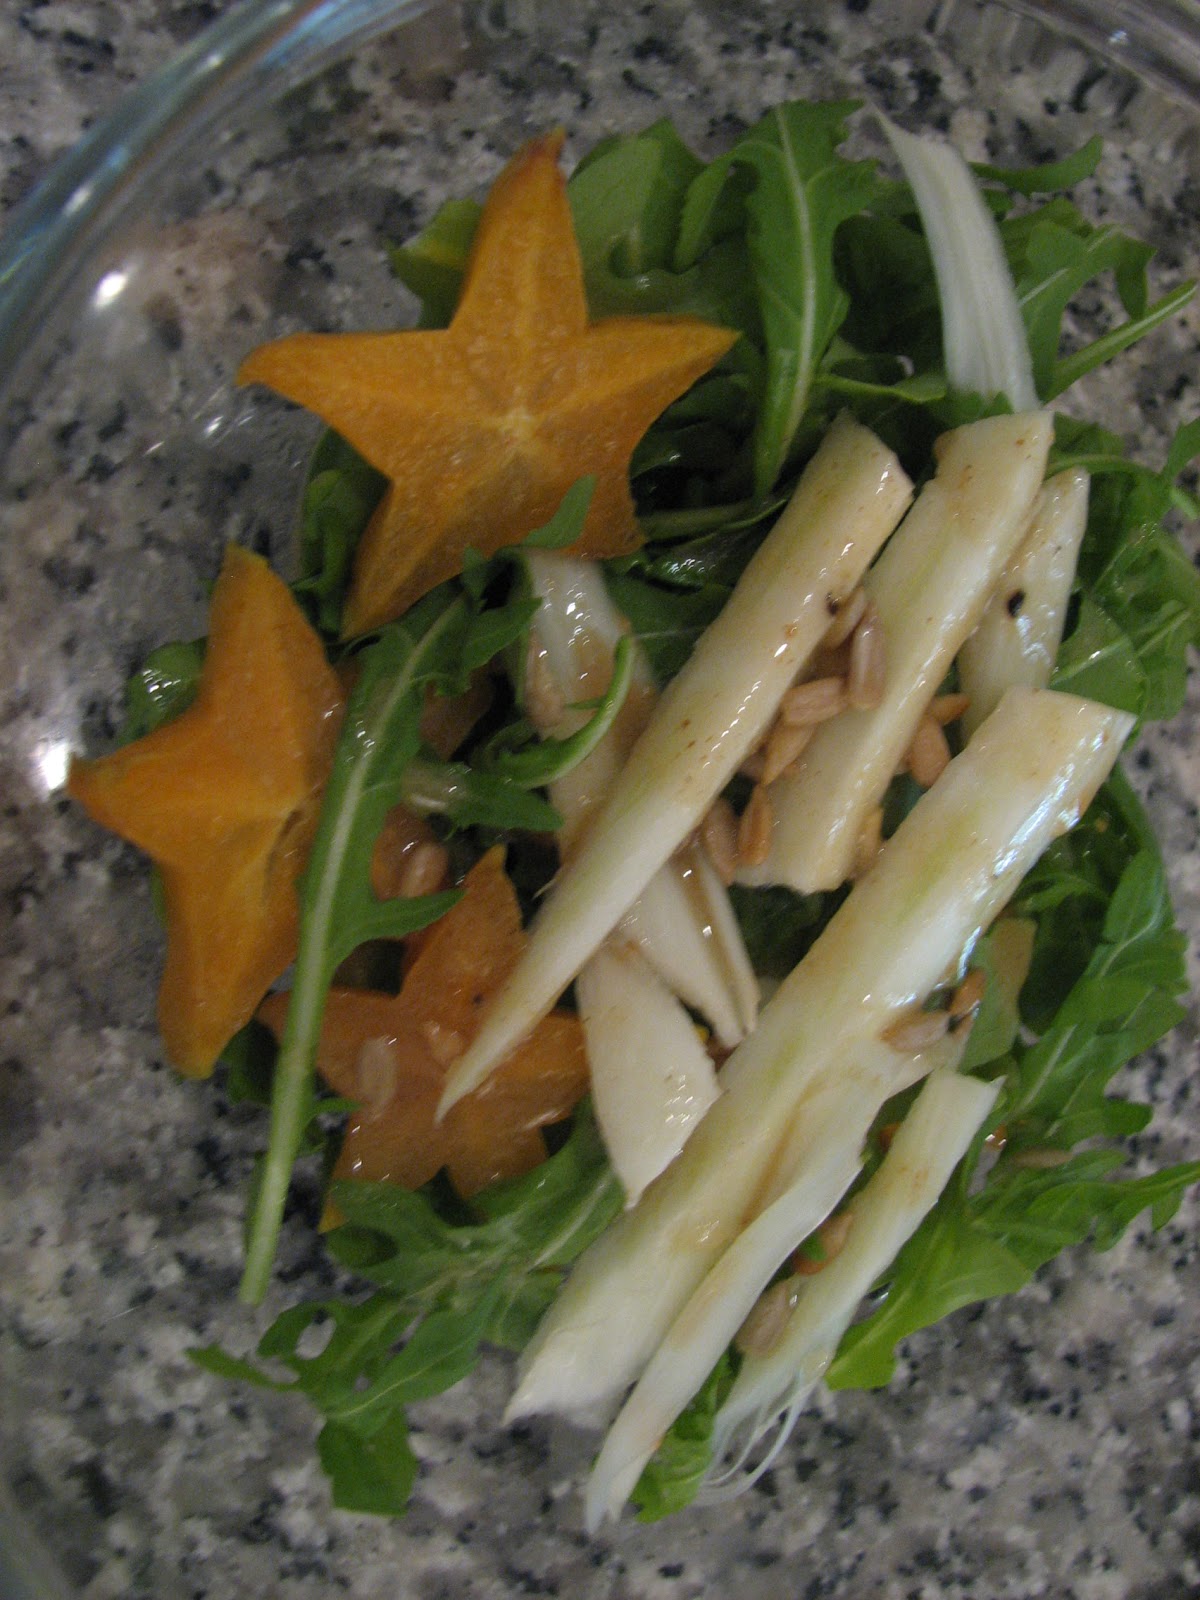
Slice it evenly – notice the beautiful shape (thus the name).
Make sure you pull or push out the seeds.  Now it’s time to compose this perfect summer salad.  I’m going to fill half the bowl with organic baby arugula – it’s peppery and sharp.  Next, I’m going to add about half the star fruit slices and for added freshness and texture, I’m going to slice up a ¼ of a fresh fennel bulb.
I’m slicing the fennel lengthwise and I’m going to dress this salad with my go-to Dijon mustard vinaigrette (see my entry on “Cold Pressed Olive Oil” for the recipe) and garnish it with roasted sunflower seeds.  A great salad is all about textures so in this one we have the sharp, crisp fennel ribs, the sweet soft star fruit, the crunchy sunflower seeds and the peppery arugula greens.  The fennel and arugula are a very traditional Mediterranean combination – the carambola makes it new world – a perfection fusion of both.
For this summer luncheon, I have a few slices of London broil leftover from dinner and a wonderful country bread.  I’m going to use some of the fennel fronds to flavor a spread for the bread: 1 teaspoon sour cream, 1 teaspoon mayo, pinch of sea salt, some fresh black pepper, 1 teaspoon chopped fennel fronds = great spread for my sandwich!
This is a wonderful summer lunch.

Balsamic Reduction
One of the hallmarks of a great meal is a memorable desert.  Since the best cooking begins with the best shopping, I was thrilled to find that my local market had fresh papayas flown in from Guatemala.  I selected a beautiful 4 lb specimen that had just the right (it should be to be speckled and fragrant) and perfectly ready to eat right away.  I sliced it in half (lengthwise) and scooped out the black seeds.  [NOTE: dry a few and see if they’ll germinate – I’ve got one growing in a pot in my back yard.]
Because we’re only 2 for lunch, I sliced the 4lb papaya in half.  I’m going to serve it with a balsamic reduction – this is a spicy syrupy concoction… it takes a fresh fruit plate to a new level of sophistication and it’s very easy to do.  [DIFFICULTY: 2 SOPHISTICATION: 8]  Measure out 1/3 cup of sugar, add in a dash of cayenne pepper, a ½ teaspoon of thyme, a dash of allspice and a pinch of Kosher salt.  If you have any vanilla beans, a half of one will do nicely – if not, a few drops of good vanilla extract will also do. 
Notice that I put all the dry ingredients directly into the sauce pan.  Now, measure out 2/3 cup of balsamic vinegar (it can be the store brand – it doesn’t have to be the $45/oz version) and pour it into the saucepan as well.  Mix everything together gently and turn on the heat (med-high) and leave it alone for 5 minutes. 
It goes through a change of state and becomes thick, viscous and reflective (hard to photograph!).  You’re done!  Turn off the heat.
At this point It’s become glossy and it has a very complex flavor.  If you chill it, it will become a very thick syrup.
Set out the fruit on a platter with a nice mound of Greek Yogurt and drizzle the still warm reduction onto the plate. 
[NOTE: this also works wonderfully with pineapple, mango, and white peaches.  It also works very well with berries like raspberries or strawberries (not so much with blueberries, though)].  Reserve most of the sauce for plating. 
Set out the fruit, drizzle your balsamic reduction onto the individual portion, add a dollop of the yogurt and dig in.
It tastes like you slaved in the kitchen but it’s actually very simple. 
I hope you enjoy these end of summer flavors in your own kitchen – let me know how your balsamic reduction came out and how you used it.
NOTE:  Last night I drizzled some onto a slice of camembert served with a bit of guava paste.  It was another fantastic example of fusing the old world with the new.
Note how glossy the balsamic reduction becomes when it's cold - it's truly an exceptional card for your culinary arsenal.  Enjoy!


Saturday, August 27, 2011

COQ AU VIN


Above: Coq au Vin – an unexpected variation: WHITE WINE!
COQ AU VIN
Coq au Vin (Chicken in red wine sauce) is a staple of old French country cooking.  However, as with everything else in life, there’s more than 1 way to skin the proverbial cat and every good recipe has great variations.  Just because its roots are French there’s very little cause for alarm… don’t be intimidated: Coq au vin = chicken stew. 
This is a great family meal when done rustic and it can be served to impress by simply straining the sauce (as I will do below) .  Either way, it is a very sophisticated and hearty dish.  Additionally, I have a wonderful bottle of (opened) French white wine in the fridge languishing.  I really want to use it  – before it turns to vinegar.  This is an inspired use of leftover wine.

I got 4 drumstick/thighs and excellent organic Swiss Chard in the greens section of my market.  I will also use celery, carrots and an onion (the holy trinity) and the prep on this dish is very simple.  I take the chicken and, using my very sharp kitchen shears (they’re sharp and strong enough to crunch right through bone – if you don’t have this type of kitchen scissors, use a good Butcher Knife) I cut off excess fat, skin, the knuckles off the 4 leg quarters.  Now, cut the thighs in half.  The chicken pieces should be even.
I throw the 4 knuckles into a pot of water with a carrot, a ½ celery rib, a ½ garlic clove and a ¼ of an onion.  Bring to a boil (voila chicken stock).  I want to concentrate the flavors quickly so I keep the lid on it.  As soon as it boils I reduce it, skim it with a sieve and take off the marrow scum so the broth is left clear.  Keep it warm. 
[NOTE: If you want to see the whole rundown on how to make a good homemade chicken stock see my entry: Baked Frenched Chicken.]
In a bowl, mix 1 ½ cups of flour, 2 tablespoons of kosher salt, 1 teaspoon fresh ground black pepper, ¼ teaspoon red cayenne pepper, 2 teaspoons of dry thyme (crush it with your fingers to release the oils in the dry herb) and blend all this together thoroughly.
Dredge the chicken pieces into the flavored flour (shake off any excess) and set aside.
Rough chop a large onion, 2 celery ribs, 3 small-medium carrots (peel these) and set aside.  Take 3 rashers of bacon and line the bottom of a large stock pot and put on high – we’re going to render all the fat.  Don’t make a face – you can’t do coq au vin without bacon!  [NOTE: Ok, you can substitute butter – but it’s really not the same and it burns quickly which will change the color of the sauce as well as darken the flavor.]
Don’t let the bacon burn – throw in your rough chopped onion and two peeled, mashed garlic cloves.  When the onion becomes translucent, remove and set aside along with the bacon.

Lightly brown the floured chicken – set into the bit of bacon fat in the bottom of the pot – a few at a time for just 3-5 minutes per side – just long enough to get a little golden... this takes away the raw flour flavor.  Once you’ve browned the chicken sections, deglaze the pan with the leftover white wine and then, throw in the celery stalks, the carrots, two bay leaves.
At this point, my broth is also done.  The chicken wasn’t quite covered up by the liquid in the pot (the deglazed white wine pulled up all the flavors in the bottom of the pan) so I add in ½ to ¾ of my fresh chicken broth which I strain into the big pot till everything is under liquid. 

Above: The lightly browned chicken has been returned to the pot deglazed in white wine.  Salt and pepper to taste, and then, return the chicken to the pot.
Put the translucent onions, smashed garlic cloves and cooked bacon into the pot as well.  Stir everything together, and cook for 35 minutes at medium heat. 
Now everything is under liquid - as it cooks, the sauce will reduce.  [NOTE: high heat = tough boiled chicken - be patient and use medium to medium low heat for a slow simmer].  This is the perfect moment to add fresh herbs.  I threw in fresh thyme and rosemary sprigs – right from my garden (keep them whole – makes it easier to fish out later.  If you make a bouquet garnis, use cotton butcher twine to tie it, not polyester).  [NOTE: If you don’t have fresh, use some dry.  Break them up between your fingers to help release the flavors and the oils in the dry herbs.] 
Set the lid on an angle so some of the steam escapes and the sauce reduces.  Let it all simmer slowly for 35 -45 minutes.
At this point, the chicken is almost done.  Pull out the cooked chicken pieces and place into a large pan and set into a hot oven while we finish reducing the sauce (325 F for about 15-20 minutes - this will help make the skin golden brown and intensify the flavors). 
Above: The cooked chicken gets set aside and then placed in the oven. 
The sauce is reduced slowly - over medium heat - and then strained.  Taste it at this point.  Make certain it has enough salt and pepper.  Add in a teaspoon of dijon mustard for extra kick and depth.
I’ve been craving dark greens.  While the chicken was being kept warm in my lidded pot, it sweated.  Also, I still have about ¼ of a pot full of fresh homemade stock.  I’ve cleaned and cut off the long hard stalks off from the fresh organic Swiss Chard.  I place them in the pan and add in the liquid and turn up the heat.  They wilt within 3-5 minutes and are then ready to serve.
Strain everything out of the sauce and bring back to a rolling boil for a minute – it has reduced by half.
The sauce is glistening and golden – it is perfectly salted and balanced.  Taste it again at this point.  It should not become thick like gravy – if you boil it/reduce it longer, you run that risk plus it can become too salty.  Now place the chicken back in the sauce, turn off the heat, lid and let stand for 10 minutes.  Bring to the table in a covered platter and reserve some of the sauce for a gravy boat.
Above: The final dish of Coq au Vin Blanc
The Chicken is served on a bed of wilted Swiss Chard
Accompanied with lumpy garlic mashed potatoes, roasted carrots
and asparus with a sprinkling of red pepper for garnish
and lots of sauce!!!!  Notice the irony: I'm serving
it with a glass of RED wine!

Additional Variations on the theme:
If you want to make it Belgian, do everything above but instead of wine, use a dark beer (the whole bottle) and throw in a sweet clove or two for extra unexpected depth.  If you want to make it more Parisian, add sautéed button mushrooms to the strained sauce.  If you want to make it more rustic southern country French, don’t strain the veggies out of the sauce.  If you want to serve this in cold weather – add in a few quartered potatoes and you have a hearty meal in a pot.
I hope you enjoy this little trip to France from my kitchen to your table!
 

Wednesday, August 3, 2011

CHICKEN SCHNITZEL

My father was born in the great city of Vienna.  This is why my mother, a fantastic home cook, learned some of his favorite childhood dishes and mastered them.  This is one of her most successful recipes: chicken schnitzel – with all the shortcuts and tips I can give you to make it foolproof.
Always start with the freshest chicken breasts you can find.   Because we’re going to section them, and pound the meat into flavorful little breaded medallions, start by marinating the chicken in a bit of lime juice with a splash of red wine vinegar for ½ an hour.  We’re adding flavor at every step.
I use kitchen shears to slice up these two big breasts into sections.  Follow the grain on the flesh and cut them up into equal sizes.  Each breast becomes approximately 6-8 medallions.
I’m using a hard silicone cutting board, a stainless steel hammer and a piece of plastic wrap to turn each individual section into a flat medallion approximately ¼ to ½ inch in thickness.
Between the acids from the lime, the vinegar, and the hammer, the proteins are being broken down – this will guarantee that the chicken stays moist and flavorful while it also cooks quickly and evenly. 
After you’ve pounded all the medallions, marinate them a bit more (juice of ½ lime and a good splash of red wine vinegar).  Note: they don’t have to swim in the marinade.  Take this opportunity to prep your assembly line.  Take an egg and whisk it into a ¼ cup of whole milk.  Lightly salt and pepper – we really want to add flavor at every step in this “Schnitzel” process.
Into a flat bowl add 2 parts flour to 1 part corn starch.  Add salt, fresh pepper, some dry herbs (oregano and thyme), whisk this all together.  I used grocery store unflavored breadcrumbs – to which I added salt, pepper, oregano and thyme. 
First I dredge all the medallions in the seasoned flour/cornstarch mixture.
To make sure the breading adheres to the medallion, be certain to flour the chicken very thoroughly (use your fingers - get it into every crevice).  Next, dunk each piece into the egg wash and then quickly into the breadcrumbs.  It is a messy undertaking, but so well worth it!  Set all the breaded medallions aside.

Pour flavorless oil (such as safflower or sunflower – and cold pressed if you can find it) into your straight sided frying pan and turn the heat onto high till it begins to glisten.  It should be about ½ inches of oil in the pan.  Here are a couple of tips on frying:
1.     Don’t crowd the pan.  If you put too many into the pan, it brings the temp down, this makes them absorb more oil and that’s NOT the desired result.  High heat sears the breading and keeps the flesh moist.
2.     Don’t get burned.  When setting medallions into hot oil, set them into the frying pan away from yourself instead of towards you.  Though this is obvious, being left-handed, I hadn’t thought of it.  I used to get really burned so I always stayed away from frying things.  This was one of those things my mother did right but never knew to explain.  My cousin Gertrude in Vienna pointed this out and it made all the difference.  Set the medallion into the pan at the point closest to your body and then finish at the point farthest from your body – if it splatters, it will splatter towards the back of the stovetop, not towards you.  This means no burns.  Using long handled tongs can't hurt.
3.     Don’t mess with it.  Leave the medallion alone in the hot oil until you begin to see the edges go golden brown.  The more you use tongs or forks on the medallion, the higher the likelihood of having the breading come off the chicken.  
4.     Don’t leave the kitchen.  Don’t let the oil get too hot – if everything is burning, bring the temp down.  Also, don’t let it get cold – keep an eye on it.  At this point, it all happens very quickly and it needs your full undivided attention.
I always drain the medallions on paper towels.  After each medallion is fried, I stack them on paper towel to drain the excess oil (under and on top).  At this point, if you still have a lot more to do, you can place them in the oven and keep them warm on a low setting.  Not more than 15 minutes or they’ll go dry.
I find it's best to keep my friends out of the kitchen while preparing the platter for the table – there’ll be offers of help  “…setting the table...” – these are thinly veiled attempts at snatching medallions off your platter.  Luckily, two big chicken breast halves become about sixteen medallions.
Dinner is served!  I served my chicken schnitzel with penne (dressed with olive oil and crumbled gorgonzola) and snow peas (lightly blanched in homemade stock) and a lime wedge for some extra zing.  I hope you enjoy this family recipe – a bit of family history from my kitchen to your table. 
NOTE: You can substitute pork or beef. 

Tuesday, July 5, 2011

MANGO COBBLER- A SUMMER TREAT

In South Florida summer means mangoes!  After Hurricane Wilma, my mango tree languished and showed few signs of life.  This year, it’s back!  There are many different mango varieties.  Some are very fibrous and are only good for juicing.  Others are very soft and can’t take any heat.  The mangoes from my tree are on the small side, but they are meaty, firm, sweet, perfumed and absolutely exquisite.  They also hold up well when baked. 
I stayed out of the kitchen through most of the spring [why the long silence since my last entry] and did a lot of grilling.  With summer in full swing, it’s too hot to cook outside.  Though the final result seems sophisticated and complex, it’s a very easy recipe.  In fact, pre-heat the oven to 375 degrees now, and by the time it’s hot, you’ll be done. 
I like to peel them with my (left handed) veggie peeler so that I don’t lose too much fruit in the process.  I also choose them for cooking at that first point of ripeness, when they’re firm and meaty (once they’re squishy, they’re only good for smoothies).  For this recipe I’m only going after the two big round slices on either side of the seed. 
Next, I slice these meaty half mangoes evenly (I used a total of 6 small mangoes).  This quickly becomes a lot of mango.
I’m going to sprinkle all this with a ¼ teaspoon of cinnamon and ½ teaspoon of sea salt.  (Why salt?  Because they’re already so sweet, no sugar necessary, also, the salt will add depth to the fruit’s natural sweetness).  For a last bit of depth, I add an ounce of dark rum and stir everything together.
Now melt a stick of unsalted butter and pour that into your baking dish.  I’m using a Portuguese porcelain baking dish because it’s so easy to clean and looks elegant on the table.  (11” x 8 ½ “)
Next, the hard part: sift 1 cup of white sugar, ½ teaspoon of salt, 2 teaspoons of baking powder (not baking soda!!!), ½ teaspoon cinnamon, ½ teaspoon allspice and/or ground nutmeg.  For that extra bit of flair, add a ½ teaspoon of dry oregano.  Mix thoroughly (in simple terms, take a whisk or a fork – the sugar and salt will break up any lumps in the flour.  I always put a dash of pepper into all my desserts, so I add a small dash of cayenne + a turn on the peppermill for extra depth into the dry ingredients. 
Add in a cup of milk and a teaspoon of real vanilla extract.  Mix thoroughly, but don’t over-mix.  Pour the batter into the pan.  The butter will almost overtake it.
Lay the fruit into the baking dish so that it thoroughly covers the dish.
Put it into the oven and set the timer for 35 minutes.  If a toothpick comes out clean after that, take it out and let it cool.  If it’s very humid, it might take another 5 minutes.
Maybe served warm or room temp.  It became a part of my 4th of July table along with Tuscan Strawberries, a potato salad, hamburgers, baked chicken and a vegetable and arugula salad dressed in my go-to Dijon mustard salad dressing. 
I spooned it onto plates with French vanilla ice cream – fireworks!
The oregano really elevates the cake and the mango and rum melts in your mouth.  I truly treasure mango season, and hope you enjoy this special summer treat from my kitchen to your table. 
NOTE: can’t find mangoes where you live?  Try frozen.  They only have pulp?  Drain it thoroughly before you put it into the batter.  You can also substitute peaches, apples, pears, plums and pineapples. 
MY FINAL NOTE: use fresh whenever you can.